Creating and editing Capture Engine alarms
To create and edit a Capture Engine alarm:
1. From any of the statistics view of a Capture Engine capture window, select the item to be monitored.
2. Click in the header, or right-click the item and click . The Make Alarm dialog appears.
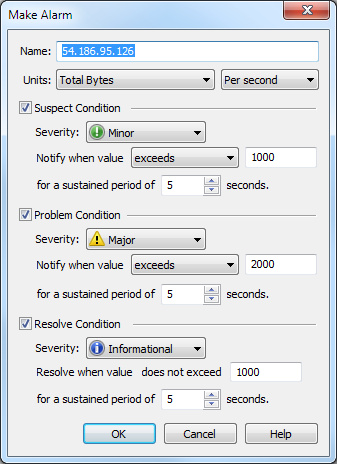
3. Complete the dialog by specifying the parameters for the alarm:
• Name: Type a name for the alarm. This name is used in the message portion of any notifications. By default, any new alarm is named for the statistical item to be monitored.
• Units: Select the units in which the alarm is testing and the time period over which the units are to be counted.
• In the list to the left, select the units in which the alarm is testing. This list changes according to the statistical parameter chosen.
• In the list to the right, select whether the units are to be counted Per second or in Total over the time periods set for each condition below.
In general, only alarms set to watch statistics which are themselves already measured in units per second should be set to Total. Alarms for all other statistics should be set to the default Per second
• Suspect Condition: Select this check box to specify the parameters for a Suspect Condition for the current statistics parameter. Suspect conditions are typically used to not less severe states.
• Severity: Select the severity of the notification to be sent when the suspect conditions are met.
• Notify when value: Select exceeds or does not exceed from the list and enter a value in the adjacent text box.
• For a sustained period of ____ seconds: Type or enter the number of seconds the suspect condition has to be detected before an alarm is sent.
• Problem Condition: Select this check box to specify the parameters for a Problem Condition for the current statistics item. Problem conditions are typically used to note more severe states.
• Severity: Select the severity of the notification to be sent when the problem conditions are met.
• Notify when value: Select exceeds or does not exceed from the list and enter a value in the adjacent text box.
• For a sustained period of ____ seconds: Type or enter the number of seconds the problem condition has to be detected before an alarm is sent.
• Resolve Condition: Select this check box to specify the parameters for when either the Suspect Condition or Problem Condition has been “stood down” or resolved.
• Severity: Select the severity of the notification to be sent when the resolve conditions are met.
• Resolve when value does not exceed: Enter a value.
• For a sustained period of _____ seconds: Type or enter the number of seconds the resolve condition has to be detected before an alarm is sent.
TIP: A single alarm can test for two distinct levels: Suspect Condition and Problem Condition. Both sets of conditions share the same Resolve Condition. This allows you to create a yellow alert / red alert / stand down for the same statistics parameter in a single alarm. Alternatively, you can specify only the Suspect Condition or only the Problem Condition for an alarm.
4. Click to create the alarm. The alarm is automatically added to all lists of that Capture Engine.
TIP: A tripped alarm is displayed as an icon in the Captures tab of the Capture Engines window. The icon matches the severity of the alarm state (i.e., Suspect, Problem, Resolve).