Setting triggers
Triggers are used to start or stop captures at a specified time or network event. They are very useful for pinpointing the origins of intermittent network problems. For example, you can set a start trigger so that the capture begins when a problem occurs. Conversely, you can stop capturing when the problem occurs so that you can see exactly what happened just prior to the observed symptom. Alternatively, if you know that problems occur at a particular time, you can set a time event to begin capturing packets during that time. Start and stop triggers can help you uncover many hard-to-find network problems.
You can create a start trigger, a stop trigger, or both a start and stop trigger for each capture window that you have open.
NOTE: To set triggers on a Capture Engine capture window, see Setting start and stop triggers on a Capture Engine.
To set start and stop triggers:
1. On the menu, click …. The Capture Options dialog appears.
2. Select the Triggers options.
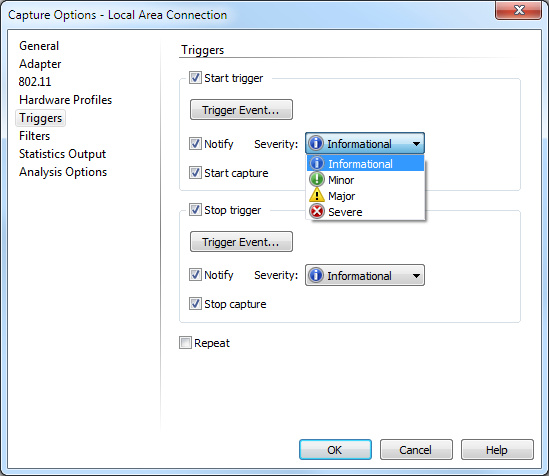
3. Select the Start trigger check box to enable a start trigger.
• Click to configure the event that will start the capture. You can set the following types of trigger events:
• Time: Capture starts when a user-specified time occurs. Here are the options for setting a time trigger event:
Absolute time: Select this option to set a specific time for a start trigger. Enter the time in the box.
Use date also: Select this option to also set a specific date for a start trigger. The start trigger is activated when both the date and absolute time occurs.
Elapsed time: Select this option to set an elapsed time for a start trigger. Enter an interval defined in days, hours, minutes, and seconds. The count for a start trigger begins when you click the Start Trigger button in the capture window or otherwise start the trigger watch (for example, automatically in repeat mode).
• Filter: Capture starts when the selected filter event(s) occurs.
NOTE: When both a time and filter trigger event option is selected, the capture starts when either of the trigger events occur. To filter packets, make sure you also have filters set up in the capture options.
• Bytes captured: Capture starts when the specified number of bytes are allowed to pass through the capture buffer.
• Notify: Select this option to send a notification of the selected severity when the start trigger is activated. A notification is a message sent to announce and describe the occurrence of specified events on the network.
• Start capture: Select this option to start a capture when the start trigger is activated.
4. Select the Stop trigger check box to enable a stop trigger.
NOTE: If you do not select the Stop trigger check box, packet capturing started by a start trigger continues indefinitely until it is aborted manually by the user.
• Click to configure the event that will stop (or abort) the capture. You can set any combination of the following types of trigger events:
• Time: Capture stops when a user-specified time occurs. Here are the options for setting a time trigger event:
Absolute: Select this option to set a specific time for a stop trigger. Enter the time in the box.
Use date also: Select this option to also set a specific date for a stop trigger. The stop trigger is activated when both the date and absolute time occurs.
Elapsed time: Select this option to set an elapsed time for a stop trigger. Enter an interval defined in days, hours, minutes, and seconds. The count for a stop trigger begins when capture commences.
• Filter: Capture stops when the selected filter event(s) occurs.
• Bytes captured: Capture stops when the specified number of bytes are allowed to pass through the capture buffer.
• Notify: Select this option to send a notification of the selected severity when the stop trigger is activated. A notification is a message sent to announce and describe the occurrence of specified events on the network.
• Stop capture: Select this option to stop a capture when the stop trigger is activated.
5. Select the Repeat mode check box if you want to reset the start trigger each time the stop trigger is activated. This option is only available when both the Start trigger and Stop trigger check boxes are selected.
NOTE: Repeat mode allows you to capture multiple occurrences of the same event(s) with a single capture window.
6. Click to close the Capture Options dialog and return to the capture window.
If a start trigger was defined, in the capture window turns into (if no start trigger was defined, does not change).
TIP: The status bar at the bottom left of the capture window provides information about the current state of the capture window.
7. Click to turn on the triggers. turns into the .
IMPORTANT: The actual capturing of packets does not begin until the start trigger event defined above occurs. Once packet capture begins, turns into .