Capture Engine alarms
Capture Engine alarms can be created, edited, and managed from the following:
Capture Engine alarms tab
Select the Settings tab, and then point to the Alarms tab for a connected Capture Engine in the Capture Engines window (see Connecting to a Capture Engine). A list of all the alarms available on that Capture Engine is displayed.
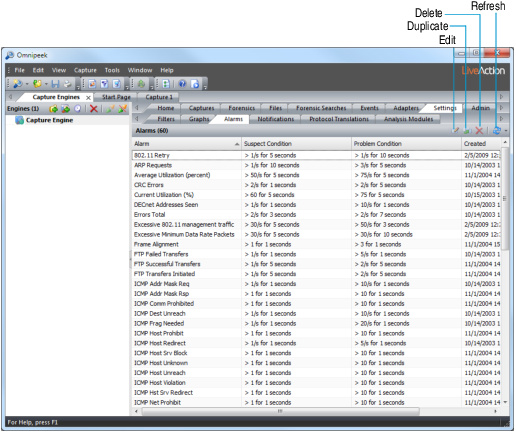
The parts of the Capture Engines window Alarms tab are identified below.
• Edit: Click to open the Edit Alarm dialog with the selected alarm’s properties ready to edit.
• Duplicate: Click to make a copy of a selected alarm.
• Delete: Click to delete a selected alarm. This may be useful when you want to delete alarms that are not used in order to make room for new alarms that you create.
• Refresh: Click to update the current view with the latest information stored on a Capture Engine. A refresh may be necessary in instances where other users may be accessing the Capture Engine at the same time, and you want to ensure that the most up-to-date information is being displayed.
• Alarm: Shows the name of the alarm, which by default is the name of the statistic to be monitored.
• Suspect Condition: Shows a shorthand version of the statistics measurements required to trigger this part of the alarm. Alarm conditions which have been triggered are shown in red.
• Problem Condition: Like the Suspect Condition column, shows a shorthand version of the statistics measurements required to trigger this part of the alarm. Alarm conditions which have been triggered are shown in red.
• Created: Lists the date and time alarm was created.
• Modified: Lists the date and time alarm was modified.
Capture Engine capture options
The Alarms options of the Capture Engine Capture Options dialog allows you to selectively enable or disable individual alarms for a particular Capture Engine capture window. From these options, you can also manage existing alarms (, , or the selected alarm).
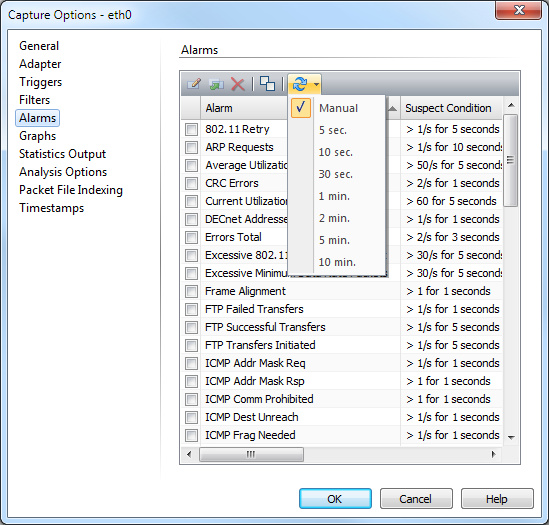
Select the check box at the left of any listed alarm to enable it. Clear the check box of any alarm you want to disable. This may be useful when you no longer wish to have that particular alarm information included in your data. You can click in the header to uncheck all alarms.
NOTE: Click to learn about the available options and settings.
Capture Engine capture window alarms
The Alarms view of a Capture Engine capture window allows you to see the current state of the alarms enabled for this capture window. You can also enable or disable individual alarms for this capture window.

The parts of the Alarms view are described below.
• Edit: Click to open the Edit Alarm dialog with the selected alarm’s properties ready to edit. You can also double-click an alarm to open the Edit Alarm dialog with that alarm’s properties ready to edit.
• Duplicate: Click to make a copy of a selected alarm.
• Delete: Click to delete a selected alarm.
• Disable All:Click to disable all alarms at once in window.
• Refresh: Click to update the current view with the latest information stored on a Capture Engine.
• Click here to send changes: Click to send changes to the Capture Engine. Changes to the dialog will not take effect on the Capture Engine until this is clicked.
• Notification column: Displays an icon representing the severity of any notification sent by an alarm that is in a triggered state.
• Enabled: Shows a check mark if the alarm is enabled. Select the check box to enable or uncheck to disable individual alarms. When an alarm is disabled it is shown in grey.
• Suspect Condition: Shows a shorthand version of the statistics measurements required to trigger this part of the alarm. This value is set in the Make Alarm dialog. Alarm conditions which have been triggered are shown in red.
• Problem Condition: Like the Suspect Condition column, shows a shorthand version of the statistics measurements required to trigger this part of the alarm. This value is set in the Make Alarm. Alarm conditions which have been triggered are shown in red.
• Alarm: Shows the name of the alarm, which by default is the name of the statistic to be monitored. This value is set in the Make Alarm dialog.
• Created: Lists the date and time alarm was created.
• Modified: Lists the date and time alarm was modified.
TIP: You can change alarm settings while a remote capture is under way. Select the remote capture in the Capture Engine Capture tab and open the Capture Options dialog. You must click Click here to send changes to the Capture Engine to set the alarm in the Capture Engine capture window.