Working in the Files view
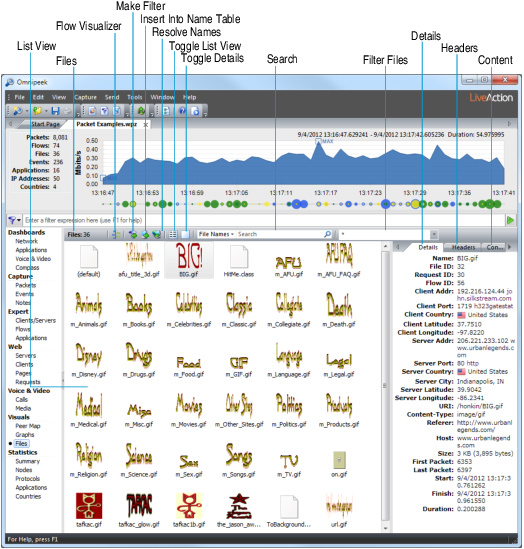
The Files view displays files extracted from reassembled HTTP payloads of capture files opened in Omnipeek. This view lets you quickly see the files that are being transmitted across your network. To narrow your search, you can even filter files by its content-type.
NOTE: The Files view is not supported in Capture Engines and in Omnipeek Professional.

The parts of the Files view are described below.
• Files: Displays the total number of files in the capture file.
• List View: Displays the files in the capture file.
• Make Filter: Opens the Insert Filter dialog to create a filter based on the selected file.
• Insert Into Name Table: Opens a dialog to add the client and server node addresses of the selected file into the Name Table.
• Resolve Names: Checks the DNS server for a name to match the client and server addresses of the selected file.
• Toggle List View: Toggles the list view between the options below:
• Extra Large Icons: Displays files in the list view as small icons. Images are displayed as the actual image, while other files are displayed with the icon corresponding to the content-type for the file. Hovering over a file in an icon mode displays a tooltip showing additional details of the file.
• Large Icons: Displays files in the list view as large icons. Images are displayed as the actual image, while other files are displayed with the icon corresponding to the content-type for the file. Hovering over a file in an icon mode displays a tooltip showing additional details of the file.
• Details: Displays files in the list view as a details list with multiple columns. You can click a column header to sort the files by that column. You can right-click a column header to add or remove columns. You can also view this information in the Details tab of the details pane. See Files view columns for a list of available column headings in the list view.
• Toggle Details: Toggles the details pane to appear either below or to the right of the list view (or hidden completely). You can also resize the details pane by dragging the resize control located between the details pane and list view. The details pane consists of the following tabs:
• Details: Displays various information about the selected file. You can also view this information in the list view by toggling the list view to the Details option. To copy any text within this tab to the clipboard, select the text, right-click, and click .
• Headers: Displays request and response headers for the selected file. To copy any text within this tab to the clipboard, select the text, right-click, and click .
• Contents: Displays file contents as an image, text, or binary data. You can right-click inside the tab to change the display mode to Auto, Image, Text, or Binary. Selecting Auto will pick the best mode depending on the type of file. In Image mode, at the top of the contents tab, a small area displays information about the image (proportions and color information). In Text mode, there are additional options to set the text encoding used. In Binary mode, there are additional options to change the display of data and offsets. To copy any text within this tab to the clipboard, select the text, right-click, and click .
• Search: Allows you to search the list of files for the text string that you enter in the text box. You can search file names, request/response headers, or file contents by selecting the option from the drop-down list to left of the text box.
• Filter Files: Allows you to filter the file list by content-type. The drop-down list contains common content-types (for example, image/*, text/*). Additionally, you can type in any content-type (for example, image/png) to filter files by that content-type. This essentially acts as a display filter—only files which are of the type specified are displayed; non-matching files are hidden.
You can also right-click a file to access the following options:
• Save Payload “xxx”: Saves the selected file to your hard disk.
• Open Payload “xxx” in Associated Viewer: Opens the selected file in the viewer associated with the content-type.
• Select Related Packets: Selects related packets by various options. See Selecting related packets.
• Select Related Requests: Selects related HTTP requests in the Web Requests view. See Selecting related requests.
• Make Filter: Opens the Insert Filter dialog to create a filter based on the selected file.
• Insert Into Name Table: Opens a dialog to add the client and server node addresses of the selected file into the Name Table.
• Resolve Names: Checks the DNS server for a name to match the client and server addresses of the selected file.
• View: Allows you to display the list view as Extra Large Icons, Large Icons, or Details.
• Details: Allows you to display the details pane to the Bottom or Right of the list view. You can also select None if you want to hide the details pane.
NOTE: Files that can't be completely reconstructed (due to missing segments), will not be displayed in the Files view. If the file with missing segments was embedded within an HTTP flow, the Web Requests view may still display some information about the file.
Additionally, the Files view will not display anything for HTTP responses that fall outside of the 2xx range of HTTP status codes. For complete details on all HTTP requests and responses, see the Web views.
Additionally, the Files view will not display anything for HTTP responses that fall outside of the 2xx range of HTTP status codes. For complete details on all HTTP requests and responses, see the Web views.