DMS Devices tab
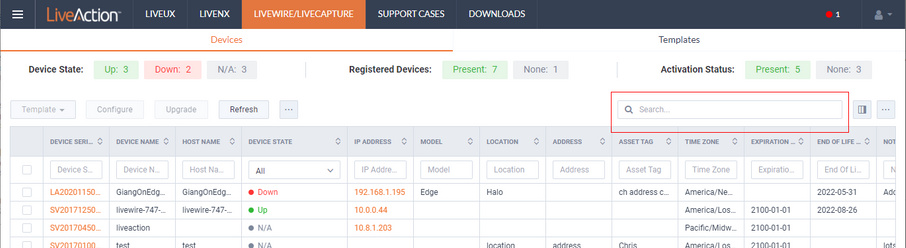
The DMS Devices tab displays the LiveWire devices associated with your account. A description of each of the available options and settings in the Devices tab is provided below:
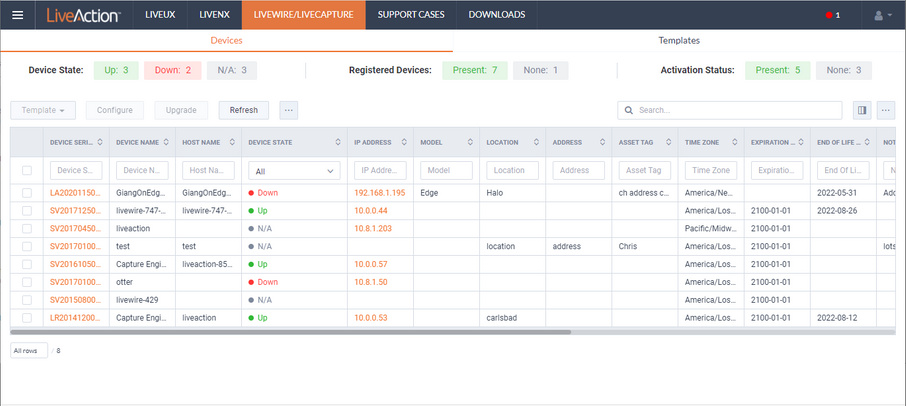
Device State
The Device State displays whether the device is able to connect to the DMS portal.
• Up: Displays the number of devices that were able to connect the DMS portal.
• Down: Displays the number of devices the DMS portal has not heard from in the last two intervals. The default interval is 10 minutes.
• N/A: Displays the number of devices that are not available to the DMS portal.
Registered Devices
The Registered Devices displays the number of devices that have registered with the DMS portal.
• Present: Displays the number of devices that have registered with the DMS portal.
• None: Displays the number of devices that have not registered with the DMS portal.
Activation Status
The Activation Status displays the number of devices that have been activated.
• Present: Displays the number of devices that have been activated with the DMS portal.
• None: Displays the number of devices that have not been activated with the DMS portal.
Template
Click the button to select a template to apply to the selected devices. Templates allow you to apply version-specific settings to one or more devices. To create a template or modify an existing template, see DMS Templates tab.
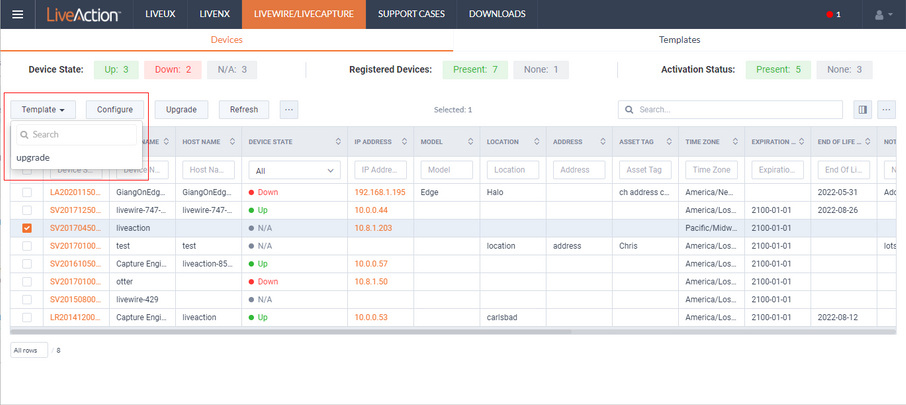
Configure
Click the Configure button to configure the selected devices. If multiple devices are selected, certain configuration options will not be available and greyed out; for example, the Device Name. There are tabs available for configuring Settings, Time Settings, and Authentication.
Settings
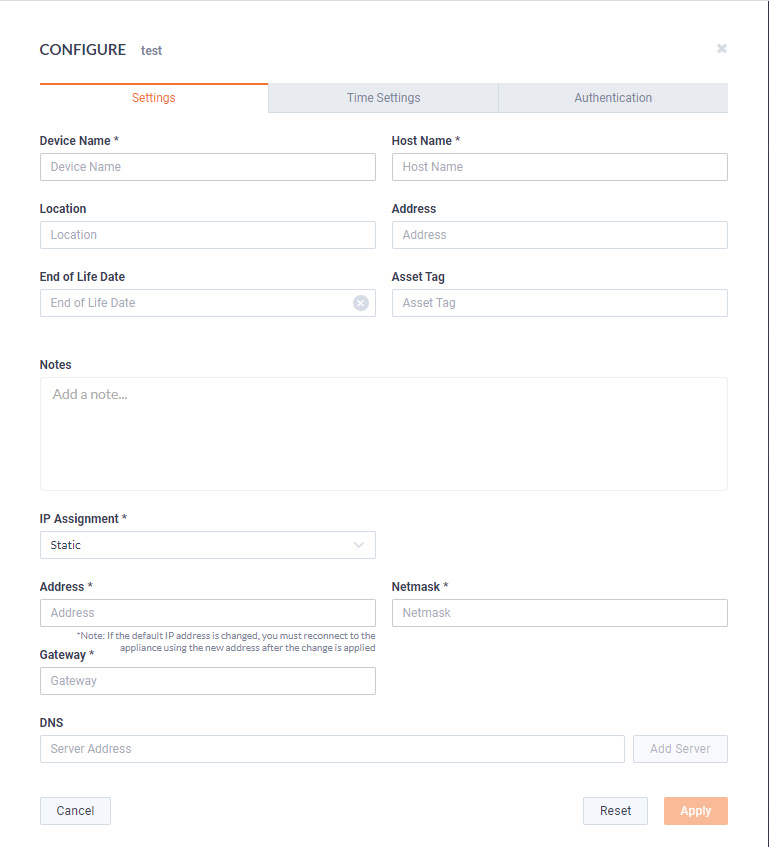
• Device Name: Displays the unique name given to the device. Type a new name to change the name.
• Host Name: Displays the host name of the device used by DNS.
• Location: Displays the general location of the device. Type a new location to change the location. We suggest entering the physical location of the device for the organization. For example, ‘Office.’
• Address: Displays the mailing address of the device. For example, 123 Main St., New York, NY.
• End of Life Date: Displays the date when the device should be replaced.
• Asset Tag: Displays the asset tag of the device. Type the asset tag to change it.
• Notes: Type any notes to add to the device you are configuring.
• IP Assignment: Displays the current IP assignment for the device. You can select either DHCP or Static. If the IP Assignment is DHCP, then the IP assignment is configured automatically via the DHCP server. If the IP Assignment is Static, then the options below are available:
IMPORTANT: LiveWire is pre-configured to obtain an IP address automatically from a DHCP server; however, we strongly recommend the use of a static IP address for LiveWire. If DHCP is selected as the IP Assignment, and if the address should change on a new DHCP lease, then you must look up the new IP address assigned to LiveWire.
NOTE: If DHCP is selected, you have approximately two minutes to connect LiveWire to your network in order for the DHCP server to assign an IP address. If an IP address is not assigned to LiveWire by the DHCP server within two minutes of being connected to the network, LiveWire defaults to a static address of 192.168.1.21. Please make sure LiveWire is connected to your network within the two minute time period from the time you click . If you reboot LiveWire, the two minute clock is also reset.
• Address: Displays the IP address assigned to the device. Type a new address to change the IP address.
• Netmask: Displays the netmask address assigned to the device. A netmask address, combined with the IP address, defines the network associated with device. Type a new address to change the netmask address.
• Gateway: Displays the gateway address, also known as ‘default gateway,’ assigned to the device. When the device does not have an IP route for the destination, the IP packet is sent to this address as it does not know how to direct it locally. Only a single default gateway can be defined. Type a new address to change the gateway address.
• DNS: Enter the address of any DNS (Domain Name Server) servers to add to the configuration. A Domain Name Server translates domain names (e.g., www.liveaction.com) into an IP address. To add a DNS server, enter the address of the server, and click . Multiple DNS name servers can be defined. You can also edit or delete any defined DNS servers.
• Add Server: Click to add the DNS server to the configuration.
• DNS Servers: Displays the DNS servers added to the configuration.
• Edit DNS: Click to edit or update the DNS server in the configuration.
• Delete DNS: Click to delete the DNS server from the configuration.
• DHCP Timeout: Displays the amount of time (in seconds) the device will wait for a DHCP address.
Time Settings
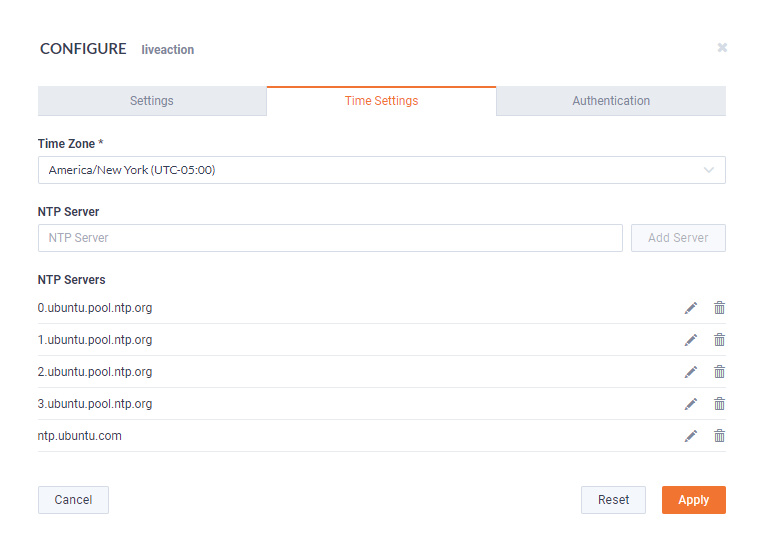
• Time Zone: Displays the time zone of the device. Select a different time zone to change the time zone.
• NTP Server: Enter the address of any NTP servers to add to the configuration, and then click .
• NTP Servers: Displays the list of NTP servers added to Time Settings. You can click the icon to edit an NTP server in the list, or click the icon to remove an NTP server from the list.
Authentication
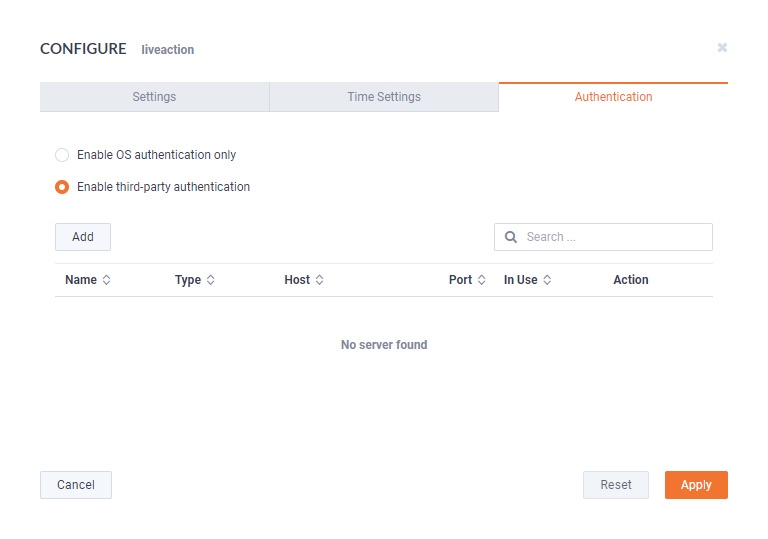
• Enable OS authentication only: Select this option to use the local OS authentication.
• Enable third-party authentication: Select this option to use TACACS+ or RADIUS authentication. If this option is selected, click to configure the new authentication setting.
• Add: Click to add a new authentication setting. You will need to configure the new authentication setting.
• Search: Enter the text string to search the list of authentication settings.
• Name: Displays the name of the authentication setting.
• Type: Displays the type of authentication, which can be either ‘RADIUS’ or ‘TACACS+.’
• Host: Displays the host of the authentication setting.
• Port: Displays the port of the authentication setting.
• Secret: Displays the secret key of the authentication setting.
• In Use: Displays whether or not the authentication setting is in use.
• Action: Click the Edit icon to edit the authentication setting, or click the Trash icon to delete the authentication setting.
• Apply: Click to save the authentication setting.
Upgrade
Click the button to upgrade the selected appliance remotely through the DMS. The version that the appliance is upgraded to is the latest shipping version of the appliance. There is no capability to upgrade to a previously released version.
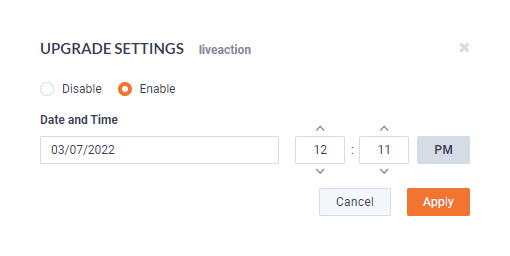
• Disable: Select to disable the upgrade on the selected devices.
• Enable: Select to enable the upgrade on the selected devices. If you enable the upgrade, you are presented with settings to specify the date and time the upgrade should take place. Because all communications are initiated from the device once every ten minutes, the upgrade will happen as the result of the device communicating with the network, sometime on or after the selected time.
• Apply: Click to save the changes to the selected devices.
Refresh
Click the button to refresh the list of devices.
Elipsis (…)
Click the (…) to view the following options:
• Power and Reset
• Change Password
• Share
• Create Template
Power and Reset
Select the Power and Reset option to perform the actions below on the device.
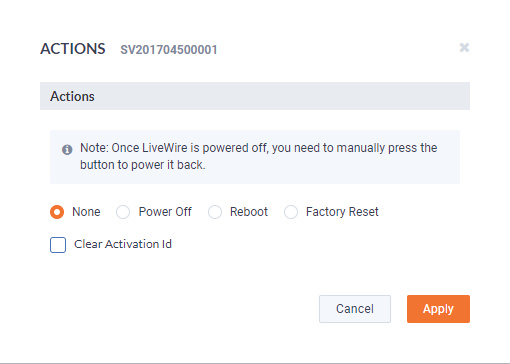
• None: Select to not perform an action on the selected appliances.
• Power Off: Select to power off the selected device. Once the device is powered off, you must manually press the power-on button on each of the devices to power them back on.
• Reboot: Select to reboot the selected appliances.
• Factory Reset: Select to reset the selected appliances to their factory default settings.
• Clear Activation ID: Select the check box to clear the activation ID.
IMPORTANT: If you select Factory Reset on a LiveWire Edge (or by either pressing the reset button or from the command line), then you will also need to also select Clear Activation ID for that appliance in the DMS.
Change Password
Select the Change Password option to change the password of the selected devices.
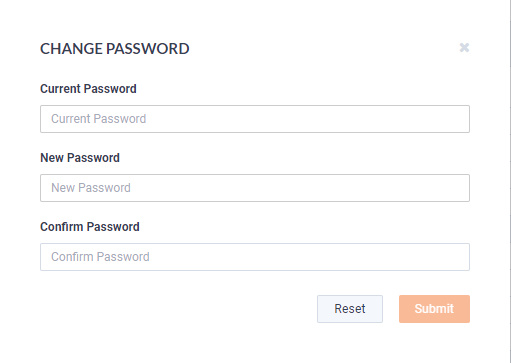
• Current Password: Enter the current password.
• New Password: Enter the new password. The new password must meet the following requirements:
Must have 5 different characters than the last password.
Must be at least 6 characters.
Must contain at least 1 number
Must contain at least 1 uppercase character.
Must contain at least 1 lowercase character.
Must contain at least 1 special character.
Must have 5 different characters than the last password.
Must be at least 6 characters.
Must contain at least 1 number
Must contain at least 1 uppercase character.
Must contain at least 1 lowercase character.
Must contain at least 1 special character.
• Confirm Password: Enter the new password again.
Share
Select the Share option to share the selected devices with other users who manage and configure appliances. You will need to add a user by completing the Manage Users dialog.

• First Name: Type the first name of the user.
• Last Name: Type the last name of the user.
• Email: Type the email address of the user.
• Reset: Click to clear the Add User values.
• Add: Click to add the user to the list of secondary users.
• Primary User: Displays the primary user of the device when the device was registered with LiveAction. If multiple appliances are selected in the list of devices, the Primary User is not displayed.
• Secondary User(s): Displays any secondary users assigned to the device. If multiple appliances are selected in the list of devices, the Secondary User(s) are not displayed.
Create Template
Select the Create Template option to create a template based on the configuration of the selected device. Once created, the template can be selected when you click the button. See also Template and DMS Templates tab.
Search
Use the Search field to locate a specific device in the list of devices. Simply enter a text string to display all appliances that match the text string.
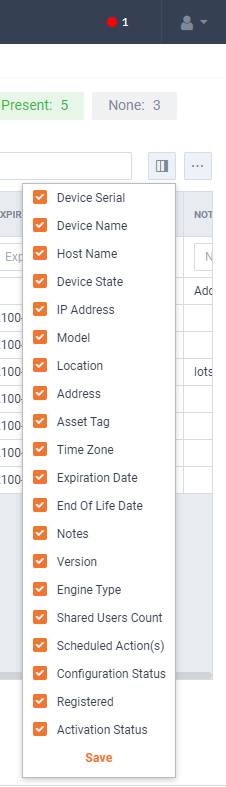
Display Columns
Click the icon and then select the columns you want to display in the list of devices.
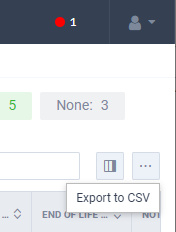
Export to CSV
Click the icon (…) to display an option for exporting the list of devices to a .csv file.
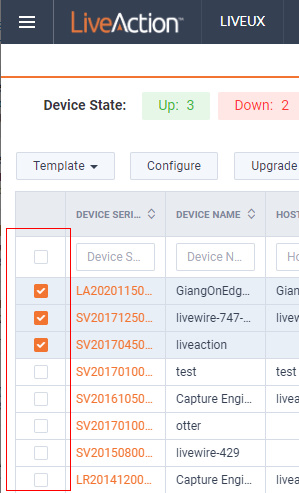
Check Box
To select a device in the list of devices, select the check box of the desired devices. Selecting the check box at the top of the column allows you to select or clear the check boxes of all devices in the list of devices.
Devices column headings
Descriptions of the columns displayed in the list of devices are provided below.
TIP: Below each of the column headings is either a text box or list box that you can use to filter the devices displayed in the list of Devices. To filter using the text box, simply enter a text string to display the devices that match the text string. To filter using a list box, click the box and select an option to display the devices that match that option.

• Device Serial: Displays the serial number of the device.
• Device Name: Displays the name of the device.
• Host Name: Displays the host name of the device used by DNS.
• Device State: Displays whether the device is Up or Down. A device is up if it has contacted the DMS in the last 25 minutes.
• IP Address: Displays the IP address of the device. The IP Address value is a link which can be used to connect directly to Omnipeek running on the device. This makes it easy to use the DMS as a launch pad to access all of the devices being managed. It can also be used to discover the IP Address in the case where the device is set to DHCP, or for some other reason the IP Address is not known. The IP Address is provided by the device every time the device connects back to the portal, which by default is every 10 minutes. This way, if the IP Address of the device changes, the IP Address value displayed in the DMS portal will reflect that.
• Model: Displays the model of the device (Edge, 1100, 3100, or Virtual).
• Location: Displays the location of the device.
• Address: Displays the address of the device. Typically, this is the mailing address where the device is located.
• Asset Tag: Displays the asset tag of the device.
• Time Zone: Displays the time zone of the device.
• Expiration Date: Displays the date that the maintenance on the device will expire. Once the expiration date has passed, you can still access the DMS and use it to manage most of the device configuration; however, until the maintenance is renewed, the device cannot be upgraded to a newer version. As LiveAction releases new versions a few times a year with significant improvements, we recommend keeping the devices up to date with the latest releases of the software.
• End Of Life Date: Displays the date for when the device should be replaced.
• Notes: Displays any notes entered for the device.
• Version: Displays the version number of the software installed on the device.
• Engine Type: Displays the type of device, which can be LiveWire, LiveCapture, or LiveWire Virtual.
• Shared Users Count: Displays the number of secondary users that have access to the device.
• Scheduled Action(s): Displays any ‘Actions’ scheduled for the device.
• Configuration Status: Displays any status associated with configuration of the device.
• Registered: Displays a check mark if the device has been registered with LiveAction.
• Activation Status: Displays a check mark if the license on the device is valid and not expired.