Configuring general options
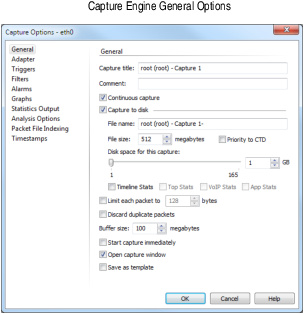
The General options of the Capture Options dialog lets you name the capture and set various packet capture parameters for each capture window that you create. The capture options that are available when capturing locally from Omnipeek or remotely from a Capture Engine, differ slightly as shown below.
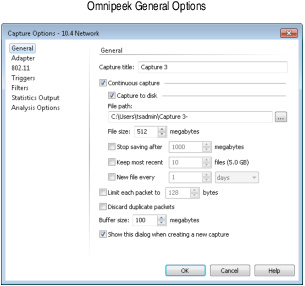
Here are descriptions of each of the General capture options:
• Capture title: Type a descriptive name for the capture window. Unique names can help you to identify and organize your capture windows.
• Comment (Capture Engine only): Enter any optional comments for the capture window. A comment that describes the capture’s settings and purpose is often a useful reminder to yourself and others of the data provided by the Capture Engine.
• Continuous capture: Select this option to enable the continuous capture of packets into the capture buffer. If this option is enabled, older data in the capture buffer is replaced with newer data as the capture buffer becomes full. Capture does not stop until stopped by the user or by a stop trigger.
IMPORTANT: When you select Continuous Capture, statistics for the capture window will reflect all of the packets seen since it last began capturing. If you did not also choose Capture to disk, only the packets currently in the buffer are available for analysis.
• Capture to disk: Select this option to save packet files on your disk. Packet files saved to your hard disk can be opened and analyzed at a later time with Omnipeek. If you are more interested in speeding up analysis of the data and conserving hard disk space, you may want to disable Capture to disk.
In a Capture Engine, the packets are saved to the data folder configured when you set up the Capture Engine. See the Capture Engine for Omnipeek Getting Started Guide that ships with your Capture Engine, or the online help in the Capture Engine Manager application.
NOTE: Capture to disk options in the General capture options of a Capture Engine are not available if a reserve of free (unused) disk space is not available on the Capture Engine. The reserve is calculated as the sum of 11GB plus 3% of the total disk space on the Capture Engine (a minimum of 5GB, and a maximum of 1TB).'
• File path (Omnipeek only): Type, or browse to, the location for saving capture files.
• File name (Capture Engine only): Type the name used as a base file name prefix for each capture file that is created using the Capture to disk option. Additionally, each capture file is appended with a timestamp indicating the date and time the file was saved. The format of the timestamp is YYYY-MM-DD-HH.MM.SS.mmm.
NOTE: You can save capture files directly to a Libpcap (*.pcap,*.cap, *.dmp, or *.appcap) or PcapNG (*.pcapng or *.ntar) file format by appending the file name entered in the File path or File name fields with the desired file format extension. By default, if no file format extension is specified, then the capture file is saved as a LiveAction packet file (*.pkt).
TIP: By default, the timestamp reflects local time and is placed immediately after the file name you entered. You can specify an alternate location of the timestamp within the file name by using the # character as a token for the timestamp. To have the timestamp written in Coordinated Universal Time (UTC) instead of local time, place the letter z immediately after the hash symbol. When UTC is in use, the letter z will appear at the end of the timestamp.
• File size: Enter or select the maximum file size before a new file is created.
• Priority to CTD (Capture Engine only): Select this option so that real-time analysis doesn't impact the capture-to-disk (CTD) performance. When this option is enabled, it is less likely that packets are dropped when they are captured to disk. If capturing all the packets to disk is desirable, enable Priority to CTD. If analysis is more important, disable Priority to CTD.
• Stop saving after (Omnipeek only): Select this option and specify a size limit, in megabytes, for the amount of disk space reserved for all capture files that are created using the Capture to disk option. Once the size limit has been reached, the capture continues, but no more capture files are saved to disk.
• Keep most recent: Select this option and specify a limit for the number of capture files that are created using the Capture to disk option. Once the file limit has been reached, the oldest capture file is replaced with a newer capture file.
• Disk space for this capture (Capture Engine only): Move the slider control (or enter a value in the text box) to set the amount of hard disk space allocated for the capture. The minimum value of the slider is the minimum size of disk space a capture can occupy. If Continuous capture is also enabled, the capture continues forever, and the disk space set here is used as a ring buffer (similar to old Keep Most Recent option, and similar to Timeline). If Continuous capture is disabled, the capture stops when this amount of disk space has been filled.
• New file every: Select this option and specify the longest amount of time (Minutes, Hours, Days) that may elapse before the open file is closed and a new file is created.
• Timeline Stats (Capture Engine only): Select this option to populate the Capture Engine database with capture data and basic network statistics such as utilization, size, distribution, etc. These statistics are then made available through the Capture Engine Forensics tab. See Forensic search from the Forensics tab or Forensic search from the ‘Forensics Capture’ window for information on view types.
• Top Stats (Capture Engine only): Select this option to populate the Capture Engine database with top nodes and top protocols statistics. These statistics are then made available through the Capture Engine Forensics tab.
• VoIP Stats (Capture Engine only): Select this option to populate the Capture Engine database with VoIP call quality and call volume statistics. These statistics are then made available through the Capture Engine Forensics tab. See Forensic search from the Forensics tab or Forensic search from the ‘Forensics Capture’ window for information on view types.
NOTE: Selecting the VoIP Stats option may affect capture performance, especially when there are more than 2000 simultaneous calls on the network. Selecting the Top Stats option may affect capture performance, especially when there are more than 10,000 active nodes captured on the network.
• App Stats (Capture Engine only): Select this option to populate the Capture Engine database with applications statistics which are made available through the various ‘application’ displays.
• Limit each packet to: Select this option and specify a size limit, in bytes, for capturing only a portion of each packet. This is called Packet Slicing and allows you to save space in the capture buffer and disk storage (if Capture to disk is enabled). For example, entering a value of 128 will capture only the first 128 bytes of each packet. We recommend this value of 128 to ensure that the entire packet header is captured.
• Discard duplicate packets: Select this option to discard duplicate packets from the capture buffer as the packets are captured. Duplicate packets are often encountered when capturing from a SPAN or mirrored port on a managed switch.
• Buffer size: Enter a buffer size, in megabytes, for the amount of memory dedicated for the capture buffer. The capture buffer is where packet are placed for analysis. The default is 100 megabytes. A larger buffer can reduce or eliminate packet loss due to spikes in traffic. When Capture to disk is enabled and all Analysis Options are disabled, the Buffer size option is unavailable.
• Show this dialog when creating a new capture window (Omnipeek only): Select this option to display the General options of the Capture Options dialog whenever a new capture window is created.
TIP: Clear the Show this dialog when creating a new capture window check box to have subsequent capture windows created using the same settings you have just set in the Capture Options dialog. Each time you create a new capture window, it opens immediately using these settings.
• Start capture immediately (Capture Engine only): Select this option to immediately begin capturing packets once is clicked.
• Open capture window (Capture Engine only): Select this option to immediately display the capture window once is clicked.
• Save as template (Capture Engine only): Select this option to create a new Capture Engine capture template based on the current capture option settings. A saved capture template can be selected whenever you create a capture window and want that capture to have the same settings as those in the capture template.