Configuring capture options
You can have multiple capture windows open simultaneously, capturing and displaying data in real time. The various capture options in the Omnipeek and Capture Engine dialog let you configure each of these windows to have their own capture settings.
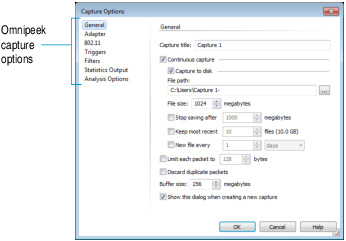
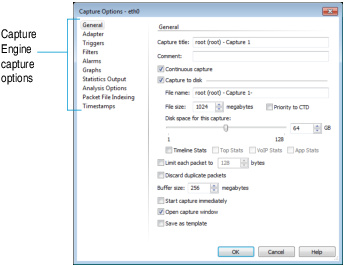
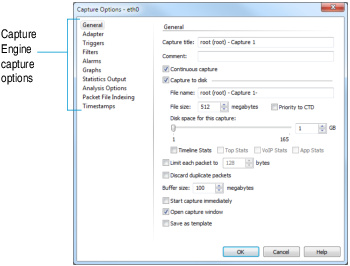
The Capture Options dialog lets you configure capture options for the following:
• General: General options let you name the capture and set various packet capture parameters. See Configuring general options.
• Adapter: Adapter options let you select and configure the adapter used for captures. All available recognized adapters are displayed in this view. In most cases, multiple captures can use the same adapter, or a different adapter, as long as each capture has a valid adapter selected. See Configuring adapter options.
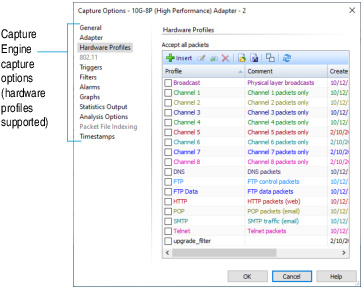
• Hardware Profiles (Capture Engine only): Hardware profiles tell a capture adapter or a capture the type of traffic to capture and how to manage that traffic. Hardware profiles are available when the selected adapter or capture supports hardware profiles. See Configuring hardware profiles.
• 802.11 (Omnipeek only): 802.11 options let you control channel selection and security for the selected wireless adapter. See Configuring wireless channels and encryption.
• Triggers: Trigger options let you set triggers to start and stop a capture based on a time event or a filter match. See Setting triggers.
• Filters: Filter options let you enable or disable filters used for capturing packets. See Enabling filters from the Capture Options dialog.
• Alarms (Capture Engine only): Alarm options let you enable or disable individual alarms for a particular Capture Engine capture window. See Capture Engine capture window alarms.
• Graphs (Capture Engine only): Graph options let you manage all aspects of remote statistics graphing capabilities. See Capture Engine graphs capture options.
• Statistics Output: Statistic output options let you control the periodic output of statistics reports while the capture is running. You can choose from several groups of statistics in a variety of report and file output formats. See Generating statistics output reports.
• Analysis Options: Analysis options let you specify capture performance by selectively disabling certain functions and freeing up system resources, specific to networking areas such as VoIP, Expert, nodes, and protocols. See Optimizing capture performance.
Analysis options let you view detailed analysis of your capture data in real time. Enabling analysis options will impact the performance of any capture, as indicated by the Capture Performance bar.
Analysis options let you view detailed analysis of your capture data in real time. Enabling analysis options will impact the performance of any capture, as indicated by the Capture Performance bar.
• Packet File Indexing (Capture Engine only): Packet file indexing options let you increase performance for forensic searches that use software filters by allowing you to specify the packet characteristics that you are most likely to use in a forensic search software filter.
In order for packet file indexing to improve forensic search performance, the forensic search must include a filter expression that incorporates the packet file indexing characteristics configured here. For example, if the capture is creating packet file indexes for IPv6 addresses, a forensic search that includes a software filter on IPv6 addresses might see an improvement in speed because of packet file indexing. See the various forensic search options in Post-capture Analysis for including a software filter in your forensic search.
Packet file indexing works best when the resulting packets from a forensic search using software filters are sparsely located within the packet files being searched. If the resulting packets exist throughout most of the packet files being searched, then the performance gains realized by packet file indexing are greatly minimized.
NOTE: NOT clauses and address clauses that include wildcard characters in the forensic search filter expression cannot improve forensic search performance using packet file indexing.
NOTE: The Capture to disk setting in the General capture options, must be enabled in order for the Packet File Indexing option to become available. If Capture to disk is disabled, then packet file indexing is also disabled and ignored.
• Timestamps (Capture Engine only): Timestamps options let you specify the smart tap manufacturer whose hardware timestamp formats are supported by Omnipeek and displayed in the capture. You can choose from the list of supported manufacturers, or you can select ‘Default.’ For example, if ‘Gigamon’ is selected, then Capture Engine and Omnipeek decodes the appended trailer timestamp added to the packet by the smart tap. The decoded timestamp replaces any existing Omnipeek timestamp and is displayed as the ‘Timestamp’ in the packet’s ‘Packet Info.’
If you select ‘Default,’ or if any of the selected manufacturer’s timestamp formats are not supported by the hardware, then the packet’s timestamp reverts to the local system time of the Capture Engine for when the packet was captured by the Capture Engine.
If you select ‘Default,’ or if any of the selected manufacturer’s timestamp formats are not supported by the hardware, then the packet’s timestamp reverts to the local system time of the Capture Engine for when the packet was captured by the Capture Engine.
IMPORTANT: If a vendor’s timestamp option is selected, then the capturing adapter must be connected to that vendor’s corresponding smart tap.
Additionally, It's important to ensure that the Capture Engine’s clock time is as close as possible to the smart tap’s clock time. For this reason we suggest using NTP with the same time zone on all smart taps and Capture Engines. If your Capture Engine is capturing aggregated data (e.g., using an adapter for LiveCapture) from multiple smart taps, it is important that the smart taps have their clock times synchronized and set to the same time zone.
Additionally, It's important to ensure that the Capture Engine’s clock time is as close as possible to the smart tap’s clock time. For this reason we suggest using NTP with the same time zone on all smart taps and Capture Engines. If your Capture Engine is capturing aggregated data (e.g., using an adapter for LiveCapture) from multiple smart taps, it is important that the smart taps have their clock times synchronized and set to the same time zone.