Configuring adapter options
The Adapter options of the Capture Options dialog lets you choose an adapter for the capture.
To select an adapter for an Omnipeek capture:
1. Click the Adapter options of the Omnipeek Capture Options dialog.
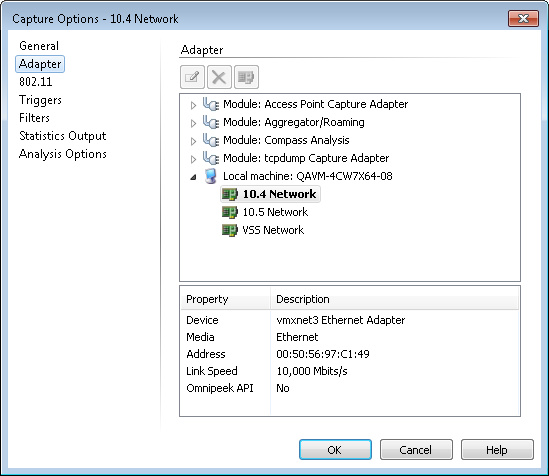
2. Select the capture adapter:
• File: Select a file or choose New File Adapter to simulate network conditions without having to be connected to a network. This option allows you to choose a LiveAction capture file and then ‘play back’ the packets into a capture’s capture buffer. This allows you to replay the packets as if they were a real, active capture.
NOTE: The File capture adapter is hidden by default. To display the File capture adapter, right-click inside the dialog and choose .
• Module: Access Point Capture Adapter: Choose New Adapter to set up a capture that will accept incoming packets from an access point, and then stream those packets into a running wireless capture window in Omnipeek. To begin streaming packets, you will need to create a new access point capture adapter entry, and then select the new adapter as the adapter for a capture window. See Capturing Packets from an Access Point Capture Adapter.
• Module: Aggregator/Roaming: Choose New Adapter to select the adapters used to aggregate data. The Aggregator/Roaming adapter lets you capture traffic from multiple sources. For wireless traffic, it captures wireless packets from multiple channels simultaneously (without scanning), measures vital statistics on each channel separately, and calculates the latency of devices roaming between access points. For wired traffic, it aggregates packets from multiple wired adapters. See Capturing Packets from an Aggregator/Roaming Adapter.
NOTE: You can also create RPCap interfaces that allow you to capture wired and 802.11 wireless traffic in Omnipeek. See Capturing Packets from an RPCap Interface.
• Module: Compass Analysis: Choose New Compass Workspace to select a Compass remote adapter. The Compass workspace lets you aggregate statistics from any number of capture files (*.pkt, *.apc, *.pcap [Libpcap format only], *.wcap [Libpcap format only], *.cap [Libpcap format only], *.wpz, and *.pcapng) over a reasonable period of time, and then display those statistics in the Compass dashboard. See Compass dashboard.
• Module: tcpdump Capture Adapter: Choose New Adapter to select an tcpdump Capture Adapter that lets you capture packets from remote computers that have the ‘tcpdump’ packet capture utility, into a running capture window in Omnipeek. To begin capturing packets, you will need to create a new tcpdump Capture Adapter entry, and then select the new adapter as the adapter for a capture window. See Capturing Packets from a tcpdump Capture Adapter.
• Local machine: Select a network adapter installed on the Omnipeek computer. All locally installed network adapters are listed; however, only a supported network adapter can be selected for a capture.
Information about the selected Omnipeek adapter is displayed below the list of adapters. For example, if you are capturing packets on a WLAN, only 802.11 wireless adapters that support the LiveAction API can be used to capture packets. If the description for Omnipeek API is Yes, the adapter can be used; if it is No, the adapter may not be a supported 802.11 wireless adapter, or it may not have the LiveAction driver installed yet. See Supported adapters.
TIP: You can right-click an adapter to configure certain settings such as network speed options (the available options are dependent on the type of adapter). In certain cases you may want to override the network speed default setting (Auto sense). For example, you may wish to set a nominal network speed for a particular adapter to ensure consistent statistics reporting.
To select an adapter for a Capture Engine capture:
1. Click the Adapter options of the Capture Engine Capture Options dialog.
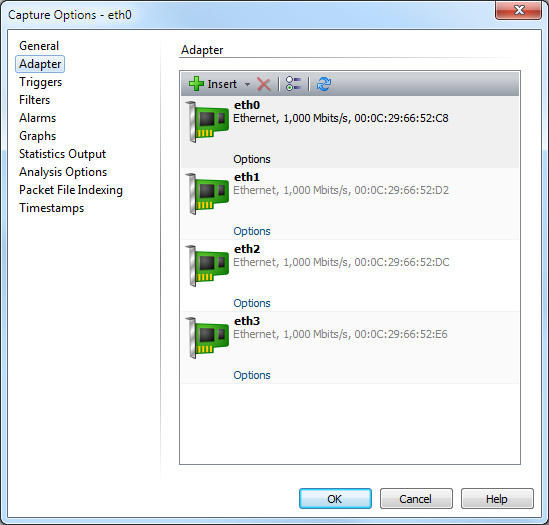
2. Select the capture adapter.
TIP: You can right-click a Capture Engine adapter to rename the adapter.
3. Click Options to open the Adapter Options dialog, where you can configure 802.11, adapter for LiveCapture, network speed, and buffer options (the available options are dependent on the type of adapter selected). For more information:
NOTE: Click on the Adapter Options dialog to learn more about the available settings.
Capturing Packets from an Access Point Capture Adapter
The Access Point Capture Adapter lets you stream packets from one or more supported access points into a running wireless capture window in Omnipeek. To begin streaming packets, you will need to create a new Access Point Capture Adapter entry, and then select the new adapter as the adapter for a capture window. You can enable, disable, and configure Access Point Capture Adapter functionality in Omnipeek from the Analysis Modules view of the Options dialog. See Access Point Capture Adapter.
To capture packets from an access point:
1. Create a new capture window in Omnipeek. The Capture Options dialog appears.
2. Select the Adapter options.
3. Double-click New Adapter below the Module: Access Point Capture Adapter entry. The Access Point Capture Adapter Properties dialog appears.
4. Enter a Name and IP Address for the capture adapter. The name can be anything and the IP address should be that of the access point. Leave the IP address blank if you want to capture packets from all access points configured to send packets to the IP address of the Omnipeek computer.
5. Click to close the Access Point Capture Adapter Properties dialog.
6. Select the new adapter and click to close the Capture Options dialog. A new capture window appears that has in the upper right corner.
7. Click . Packets will not populate the capture window until the access point begins sending packets to the Omnipeek computer as noted below.
IMPORTANT: To send packets from an access point to the IP address of the Omnipeek computer, you need to configure the access point through the user interface of the access point.
While the access point is sending packets to the Omnipeek computer, it is not operating as a true access point. When you want to stop sending packets, you must configure the access point to stop sending packets; otherwise, the Omnipeek computer will send an ICMP Destination Port Unreachable for every incoming packet received. This will impact the performance of the Omnipeek computer and possibly your network. Refer to your access point documentation for instructions.
While the access point is sending packets to the Omnipeek computer, it is not operating as a true access point. When you want to stop sending packets, you must configure the access point to stop sending packets; otherwise, the Omnipeek computer will send an ICMP Destination Port Unreachable for every incoming packet received. This will impact the performance of the Omnipeek computer and possibly your network. Refer to your access point documentation for instructions.
8. Click to stop capturing packets. No additional packets are allowed into the capture buffer.
NOTE: Any Aruba and Cisco access point remote adapters created in versions of Omnipeek prior to Omnipeek 8.1, will need to be recreated as new access point adapter entries in Omnipeek 8.1 and above.
Capturing Packets from an Aggregator/Roaming Adapter
The Aggregator/Roaming Adapter lets you capture traffic from multiple wired or wireless sources. This is especially useful if you want to capture traffic from multiple 802.11 channels simultaneously, and then want to stream that data into a single capture window.
You can enable or disable the Aggregator/Roaming Adapter functionality in Omnipeek from the Analysis Modules view of the Options dialog. See Aggregator/Roaming Adapter.
NOTE: You can also create RPCap interfaces that allow you to capture wired and 802.11 wireless traffic in Omnipeek. See Capturing Packets from an RPCap Interface.
Capturing packets from an Aggregator/Roaming Adapter is not supported from a Capture Engine.
Capturing packets from an Aggregator/Roaming Adapter is not supported from a Capture Engine.
To capture packets from an Aggregator/Roaming Adapter:
1. Create a new capture window in Omnipeek. The Capture Options dialog appears.
2. Select the Adapter options.
3. Double-click New Adapter below the Module: Aggregator/Roaming entry. The Aggregator Settings dialog appears.
4. Enter a name for the Aggregator/Roaming adapter.
5. Select either the Wired Connections or Wireless Connections option. A list of wired or wireless adapters is displayed in the window. Any wireless adapter that is not using the LiveAction API will also show up under wired connections.
If a wireless network adapter is selected, the Channel drop down menu is enabled, allowing the selection of a wireless channel. You can also select Scan mode to enable Scan Options for selecting multiple wireless channels.
6. Select the check box of one or more adapters that you want to use to capture and analyze traffic.
7. Click to close the Aggregator Settings dialog.
8. Click to close the Capture Options dialog. A new capture window appears that has in the upper right corner.
9. Click .
10. Click to stop capturing packets. No additional packets are allowed into the capture buffer.
NOTE: An aggregator capture window using wireless adapters displays roaming latency data in the three Roaming views. See Roaming latency analysis.
Capturing Packets from an RPCap Interface
If you have WinPcap installed on a computer, or if you have an access point that supports RPCap, you can create RPCap interfaces that allow you to capture wired and 802.11 wireless traffic, and then stream the traffic back to Omnipeek where it can be displayed. In Omnipeek you create and select RPCap interfaces from within the Aggregator Settings dialog.
To capture packets from an RPCap interface:
1. Create a new capture window in Omnipeek. The Capture Options dialog appears.
2. Select the Adapter options.
3. Double-click New Adapter below the Module: Aggregator/Roaming entry. The Aggregator Settings dialog appears.
4. Enter a name for the Aggregator/Roaming adapter.
5. Click Create RPCap Interfaces. The Create New RPCap Interfaces dialog appears.
NOTE: The button is available only if the WinPcap driver and libraries are installed on your computer. You can install the driver and libraries by going to www.WinPcap.org.
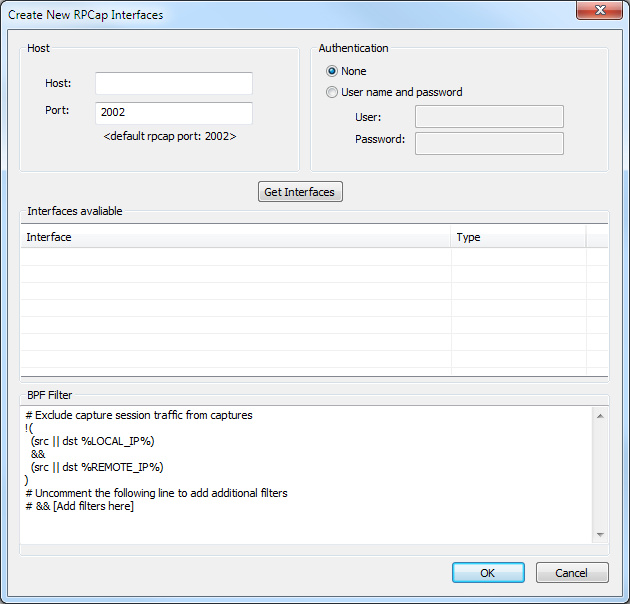
6. Enter the Host and Authentication settings for the computer where the RPCap interface is located.
7. Click . The RPCap interfaces available from the host are listed under Interfaces available.
NOTE: You can enter a pcap-filter expression in the BPF Filter section to filter the packets from the RPCap interfaces displayed in Interfaces available. A pcap-filter expression is made up using the guide found at http://www.manpagez.com/man/7/pcap-filter/. Individual filter expressions applied to an interface will override the global BPF filter only on that interface.
8. Click to close the Create New RPCap Interfaces dialog. Any available RPCap interfaces are now listed in the Aggregator Settings dialog.
9. Select the check box of one or more RPCap interfaces that you want to use to capture and analyze traffic.
If a wireless network adapter is selected, the Channel drop down menu is enabled, allowing the selection of a wireless channel.
10. Click to close the Aggregator Settings dialog.
11. Click to close the Capture Options dialog. A new capture window appears that has in the upper right corner.
12. Click to begin capturing packets.
13. Click to stop capturing packets. No additional packets are allowed into the capture buffer.
Capturing Packets from a tcpdump Capture Adapter
The tcpdump Capture Adapter, lets you capture packets from remote computers that have the ‘tcpdump’ packet capture utility, into a running capture window in Omnipeek. Essentially all UNIX-family systems, including Linux and Mac OS X, have the ‘tcpdump’ packet capture utility.
Before capturing packets using the tcpdump Capture Adapter, make sure the prerequisites on the remote host are met, as described below.
To begin capturing packets, you will need to create a new tcpdump Capture Adapter entry, and then select the new adapter as the adapter for a capture window. The steps to create a tcpdump Capture Adapter entry are described below for both the Omnipeek console and a Capture Engine. See tcpdump Capture Adapter on an Omnipeek console and tcpdump Capture Adapter on a Capture Engine.
NOTE: You can enable or disable the tcpdump Capture Adapter functionality in Omnipeek in the Analysis Modules view of the Options dialog.
Prerequisites on remote host
Before capturing packets, the following requirements must be met on the remote host:
• ‘sudo’ utility must be installed
• Disable terminal (tty) for ‘sudo’ to run ‘tcpdump’ command. Please refer to your remote host's operating system documentation for instructions on how to disable ‘tty’
• The remote user's default shell should point to a bourne or bourne-like shell; for example, bash, dash, tcsh, etc. (but NOT C-shell (csh))
Prerequisites on Ubuntu 16 remote host (and non-root user)
If your remote host is Ubuntu 16 (and above), and your user account is non-root, then the following prerequisites are required on the remote host:
1. Create a dedicated group, e.g., ‘pcap,’ for users who should be able to run tcpdump and add your user (e.g., linda) to it:
groupadd pcap
usermod -a -G pcap linda
usermod -a -G pcap linda
2. Modify the group ownership and permissions of the tcpdump binary so that only users in the pcap group can run it:
chgrp pcap /usr/sbin/tcpdump
chmod 750 /usr/sbin/tcpdump
chmod 750 /usr/sbin/tcpdump
3. Set the CAP_NET_RAW and CAP_NET_ADMIN capabilities on the tcpdump binary to allow it to run without root access (these options allow raw packet captures and network interface manipulation):
setcap cap_net_raw,cap_net_admin=eip /usr/sbin/tcpdump
tcpdump Capture Adapter on an Omnipeek console
To capture packets from a tcpdump Capture Adapter on an Omnipeek console:
1. Create a new capture window in Omnipeek. The Capture Options dialog appears.
2. Select the Adapter options.
3. Double-click New Adapter below the Module: tcpdump Capture Adapter entry. The Host Properties dialog appears. At a minimum, you must configure settings on the Host and Authentication tabs.
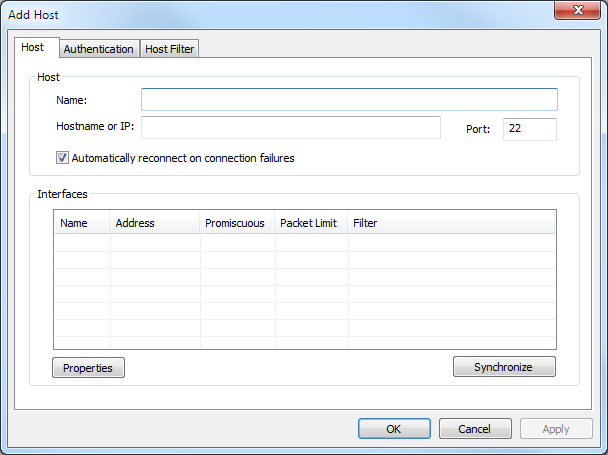
4. Configure the Host Properties dialog. :
• Host tab: This tab lets you enter a name and address of the remote host
• Name: Enter a name for the remote host computer.
• Hostname or IP: Enter an IP address of the remote host computer.
• Automatically reconnect on connection failures: Select this option to automatically attempt to reconnect to the remote host computer whenever a connection is lost.
• Interfaces: Displays the interfaces synchronized with the remote host adapter.
• Properties: Displays the properties for the selected interface. You can define Simple or Advanced tcpdump commands for the interface here.
Simple: Select this option if you want to define promiscuous and slice settings for the tcpdump commands.
Don’t put the interface into promiscuous mode (-p). (Required for some VM interfaces.): Select this option if you do not want the interface put into promiscuous mode (-p). This may be required for some VM interfaces.
Limit each packet to _____ bytes. (Default snaplen is 65535).: Select this option to change the slice value for each packet from the default (65535), and then enter the desired slice value in bytes. tcpdump includes the header, but Omnipeek does not consider the header in the slice.
Filter (BPF): Enter or select additional filters for the tcpdump commands.
Advanced: Select this option to add or define additional tcpdump commands in the text box below. If you add or define additional commands, you must redirect your output to Standard Output (stdout).
• Synchronize: Click to query the interface list from the remote host computer. If you did not configure the settings on the Authentication tab, you are prompted to enter username and password authentication settings for the remote host computer.
• Authentication tab: This tab lets you enter authentication settings for the remote host computer.
• Username: Enter the username for the remote host computer.
• Password: Enter the password for the remote host computer.
• Save Host Password: Select this check box if you want to save the password for the remote host computer.
• Login Script: Use this text box to run any additional setup steps (Linux commands) prior to doing a tcpdump capture.
• Host Filter tab: This tab lets you define the filter that removes unwanted SSH traffic from the remote host capture. The ‘Host Filter’ is part of the tcpdump commands in the Simple and Advanced properties for each interface.
• Host Filter (BPF): This text box defines the ‘Host Filter’ for tcpdump captures. You can modify the filter by editing the text inside the text box.
• Restore Default: Click to reset the ‘Host Filter’ to its default.
• Macros: Displays the macros used in the ‘Host Filter.’
5. Click to apply the settings.
6. Click to close the Host Properties dialog.
7. Select one of the newly created tcpdump capture adapters as the capture adapter for the new capture window.
8. Click to close the Capture Options dialog. A new capture window appears that has in the upper right corner.
9. Click .
10. Click to stop capturing packets. No additional packets are allowed into the capture buffer.
tcpdump Capture Adapter on a Capture Engine
To capture packets from a tcpdump Capture Adapter on a Capture Engine:
1. Create a new Capture Engine capture window in Omnipeek. The Capture Options dialog appears.
2. Select the Adapter options.

3. Click . The Configure Adapters dialog appears.
NOTE: You can also click from the Adapters tab in the Capture Engines window.
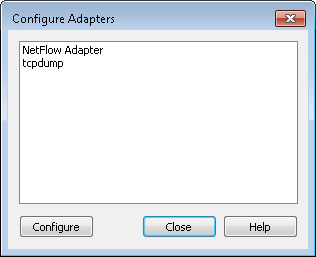
4. Select tcpdump, and click . The tcpdump Options dialog appears.
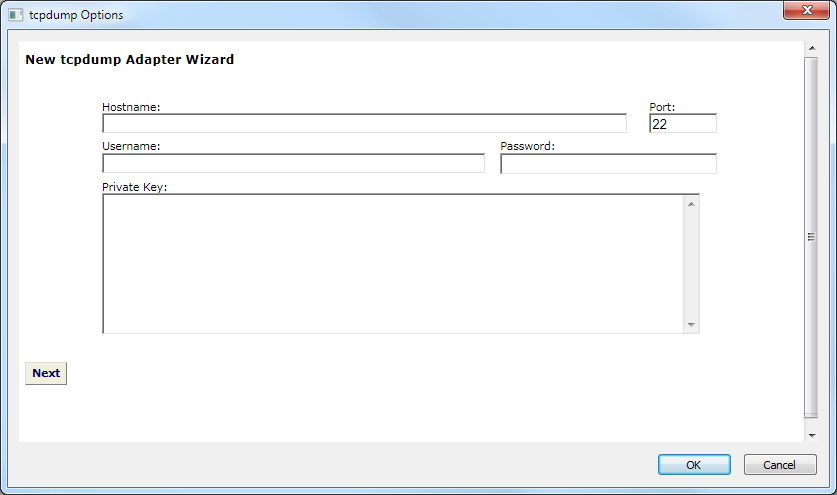
5. Configure the tcpdump Options dialog:
• Hostname: Enter the IP address of the remote host computer.
• Port: Enter the port for the remote host computer. The default port is 22.
• Username: Enter the username for the remote host computer.
• Password: Enter the password for the remote host computer.
• Private Key: Enter the private key if one is used for the remote host computer.
6. Click .
7. Click again. A list of available wired and/or wireless interfaces synchronized with the remote host adapter appears.
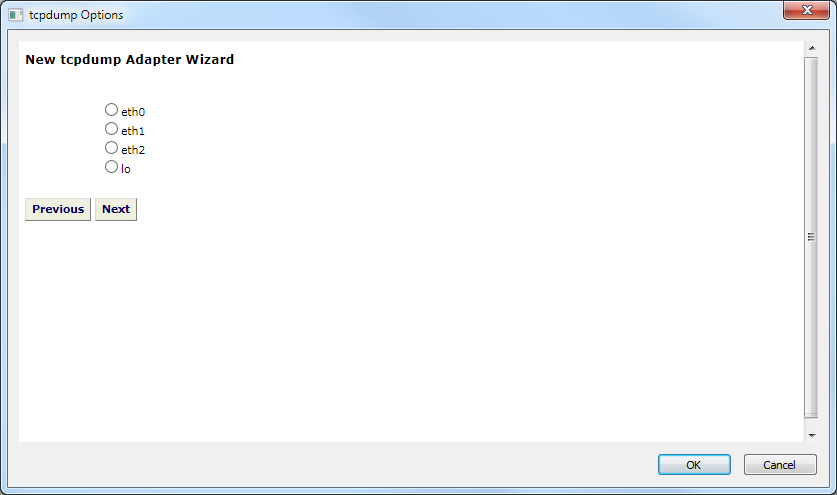
8. Select the interface that you want to configure, and click . The properties page for the selected interface appears.
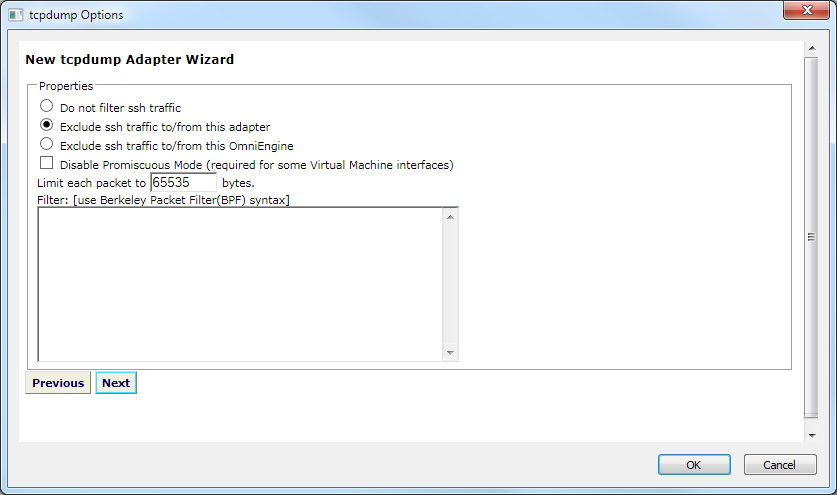
9. Configure the properties page for the selected interface:
• Do not filter ssh traffic: Select this option if you do not want to filter SSH traffic from traffic captured on the interface.
• Exclude ssh traffic to/from this adapter: Select this option if you want to filter SSH traffic from traffic captured on the interface. SSH traffic from other tcpdump adapters and sources will appear in the capture.
• Exclude ssh traffic to/from this Capture Engine: Select this option if you want to filter SSH traffic from traffic captured on the interface, other tcpdump adapters, and other SSH sessions from the Capture Engine to the remote host.
• Capture all traffic on interface (Promiscuous Mode): Select this option if you want to capture all traffic visible to the interface. If this option is not selected, then only traffic destined for the interface is captured.
• Monitor Mode (only applies to wireless interfaces): Select this option to place the wireless interface into monitor mode. The interface is able to listen to traffic but is not able to send/receive packets.
• Limit each packet to ______ bytes: Enter the maximum size packets that are allowed, Packets larger than this value will be sliced so that they do not exceed the value. The value must be a whole number between 1 and 65535. The default is 65535.
• Filter: In the text box, define any additional filters (BPF) that you want applied to the selected interface. If one of the ‘exclude ssh’ options are enabled, that ‘SSH’ filter is appended to any filter specified in the Filter text box.
10. Click to close the tcpdump Options dialog and return you to the Configure Adapters dialog.
11. Click Close to close the Configure Adapters dialog and return you to the Capture Options dialog.
12. Select one of the newly created tcpdump capture adapters as the capture adapter for the new Capture Engine capture window.
13. Click to close the Capture Options dialog. A new capture window appears that has in the upper right corner.
14. Click .
15. Click to stop capturing packets. No additional packets are allowed into the capture buffer.
Capturing packets from a NetFlow/IPFIX adapter on a Capture Engine
For supported Capture Engines (LiveCapture), a NetFlow/IPFIX adapter allows you to capture NetFlow/IPFIX data (NetFlow v5, NetFlow v9, and IPFIX) from a network device. The NetFlow Adapter listens on a port for NetFlow packets. Each NetFlow/IPFIX packet contains some number of NetFlow/IPFIX records. Each NetFlow/IPFIX record represents certain information and statistics about a network flow for that interval. The network statistics are displayed in the appropriate Omnipeek windows and in the Omnipeek reporting dashboards.
To capture packets from a NetFlow/IPFIX capture adapter on a Capture Engine:
1. Create a new Capture Engine capture window in Omnipeek. The Capture Options dialog appears.
2. Select the Adapter options.

3. Click . The Configure Adapters dialog appears.
NOTE: You can also click from the Adapters tab in the Capture Engines window.
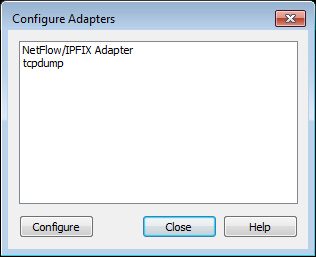
4. Select NetFlow/IPFIX Adapter, and click . The NetFlow/IPFIX Adapter Options dialog appears.
5. Configure the port in the dialog, and then click Create Adapter and click . The NetFlow adapter is added to the list of capture adapters and is available for capture use.